Skip to content
The Smart DMS Knowledge Base
  • Home
  • Documentation
  • Encyclopedia
Contact Us
Contact Us
The Smart DMS Knowledge Base
  • Home
  • Documentation
  • Encyclopedia
Contact Us
Contact Us

Introduction

3
  • Overview of The Smart DMS
  • Getting Started with The Smart DMS
  • Understanding The Smart DMS Architecture

Common

31
  • Bookmarks
    • How To Add & Remove Bookmarks
  • Communication
    • Communication Overview
    • Settings
      • Communication Settings Overview
      • Email Settings
        • How to Configure Outgoing Email (SMTP) Settings
        • Email Templates
      • SMS Settings
        • SMS Shortcode & API Settings
        • SMS Message Templates
      • WhatsApp Settings
        • Official WhatsApp API Settings
        • WhatsApp Templates
    • Panel Banners
      • Panel Banners
    • WhatsApp
      • WhatsApp Overview
      • How to Setup a WhatsApp Web Session
      • How to Subscribe to System Updates in WhatsApp Groups
    • Web Push Subscribers
      • Web Push Subscribers Overview
  • Content Management
    • How To Add Content Such As FAQs & Guides
    • Content Management Overview in The Smart DMS
    • Categories
      • Managing Content Categories
    • Tags
      • Managing Content Tags
  • Logs
    • Tracking Actions: Understanding Logs in The Smart DMS
  • Notifications
    • How to Enable/Disable Notifications
  • Roles & Permissions
    • User Roles & Permissions Overview
    • Understanding Roles & Permissions Across Central and Tenant Panels
    • How To Create User Roles
  • Search
    • Using the Global Search Bar in The Smart DMS
  • Settings
    • Authentication
      • Authentication Settings
    • General
      • General Settings Overview
      • Do I Use Tenant-Specific or Central Settings
  • Users
    • How to Register a User
    • How To Update a User & Assign Roles
    • How To Bulk Assign User Roles
    • How To Update Your Profile

Central

13
  • Main
    • Dashboard
    • Clients
      • Central Clients
    • Tasks
      • Central Tasks
    • Tenants
      • Tenant Overview — What Is a Tenant in The Smart DMS?
      • How To Create a Tenant
      • Updating a Tenant and Managing Assigned Users
      • Customizing Tenant Labels
    • Payroll
      • Payroll Overview
      • Commissions
      • How to View Your Account Balance
    • Policies
      • Managing Policy Categories
      • Managing Company Policies & Training Manuals in The Smart DMS
    • Subscription
      • How To Renew Your Smart DMS Subscription

Tenant

20
  • How To Access Different Tenants
  • Tenant Dashboard
  • Ecommerce
    • Products
      • How To Create Simple Products
      • How to Create Cable Products in Bulk
      • How To Create Variable Products In Bulk
    • Requisitions
      • How To Request Store Items
      • How To Approve Requisition Items
  • Tasks
    • Task Types
      • Task Types Overview
      • How To Create Task Types
    • Task Management
      • Task Statuses Overview
      • How To Create Tasks
      • How To View Unassigned Tasks
      • How To Mark a Task as Complete / Done
      • How To Start a Task
      • How To End a Task
    • Settings
      • Task Settings
  • Human Resource
    • Employees
      • How To Update Employees
  • Marketing
    • Marketers
      • How to Create a Marketer
    • Commissions
      • Commissions Overview
      • Uncommissioned Tasks
  • Home
  • Documentation
  • Tenant
  • Tasks
  • Task Management
  • How To Mark a Task as Complete / Done
View Categories

How To Mark a Task as Complete / Done

3 min read

Completing a task in The Smart DMS involves a guided process that confirms execution, captures client details, collects feedback, and (optionally) prepares data for commissions. This is especially important for commissionable tasks.

Task completion has two core phases:

  1. Confirmation Phase – You confirm who worked on the task, select the client account, complete any available checklist, and enter customer feedback.
  2. Payments Phase – If the task type is commissionable, the payment details are mandatory for calculating marketer commissions. If skipped, commissions will not be awarded.

Steps to Complete a Task #

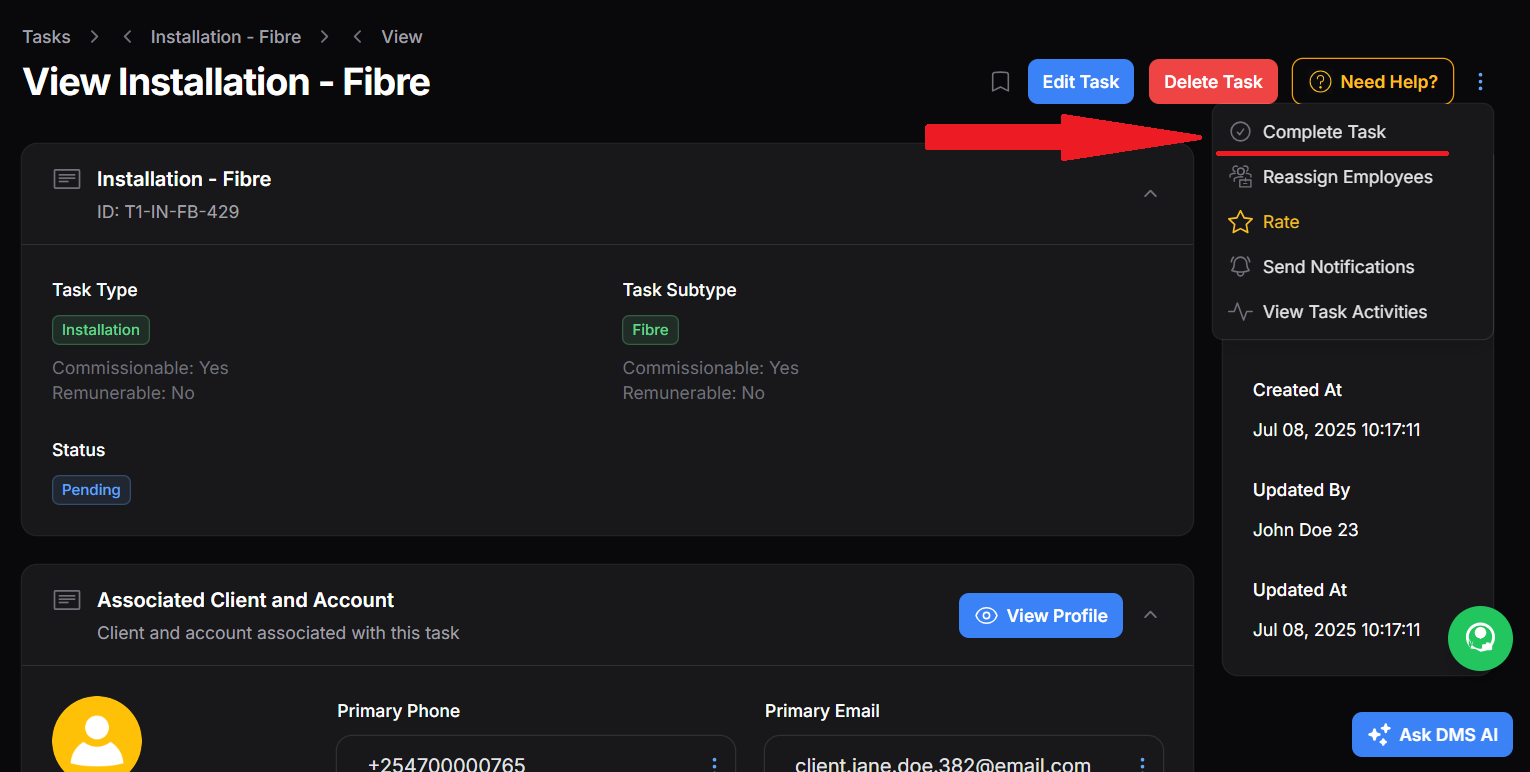
  1. Navigate to the Tasks page, or use the global search bar to find the specific task.
  2. Click View on the task.
  3. From the task page, click the three vertical dots (⋮) and select “Complete Task”. If you don’t see this option, the task is already marked as complete.
  4. Fill out the guided form in four simple steps:

Confirmation Phase – Completion Form Steps #

1. Employees #

Employees Step

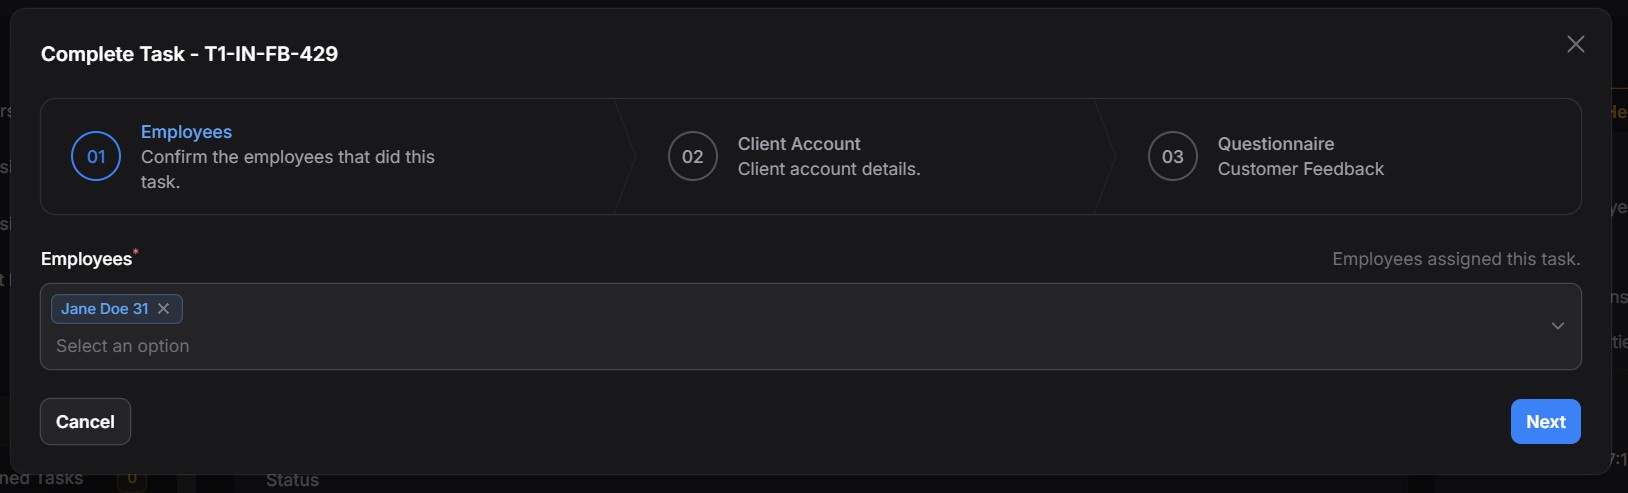
Confirm the employees who executed the task.

  • Simply select from the list of assigned employees.

2. Client Account #

Client Ste[

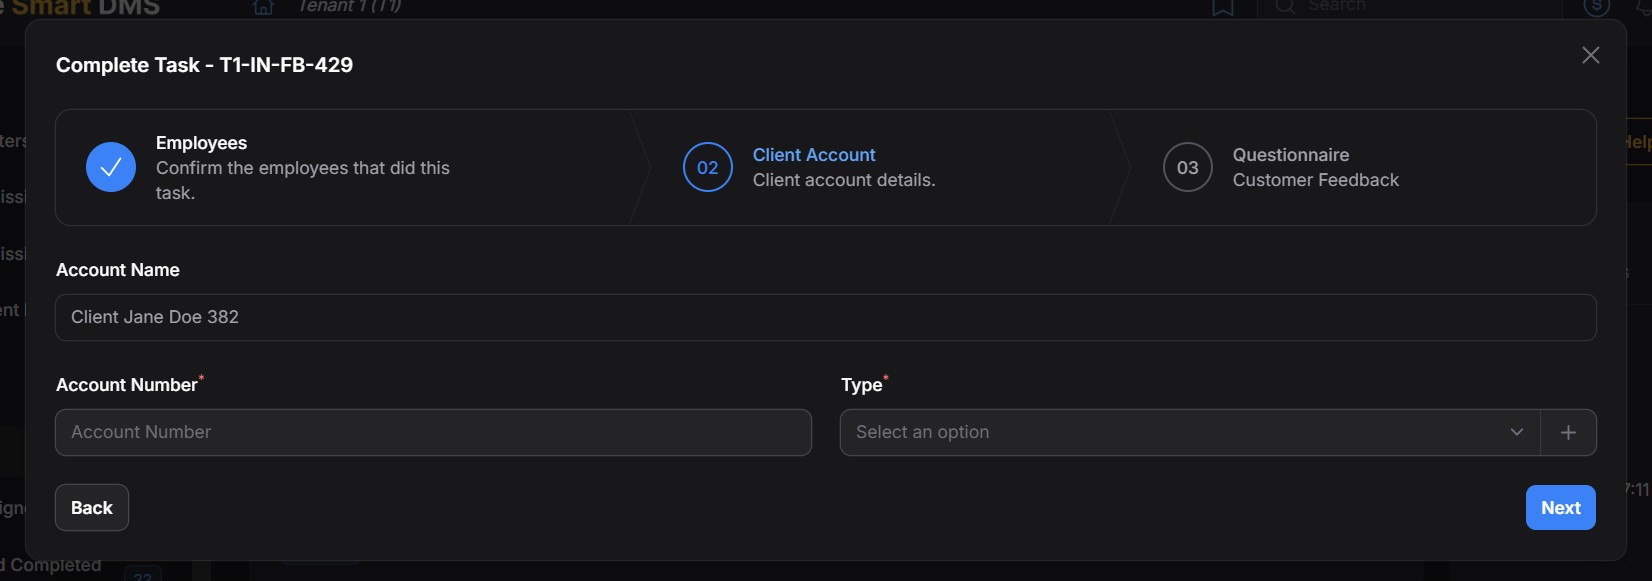
Capture the client’s account information.

  • Account Name is auto-filled.
  • Account Number and Type are required (especially if commissions apply).

3. Questionnaire – Customer Feedback #

Feedback Step

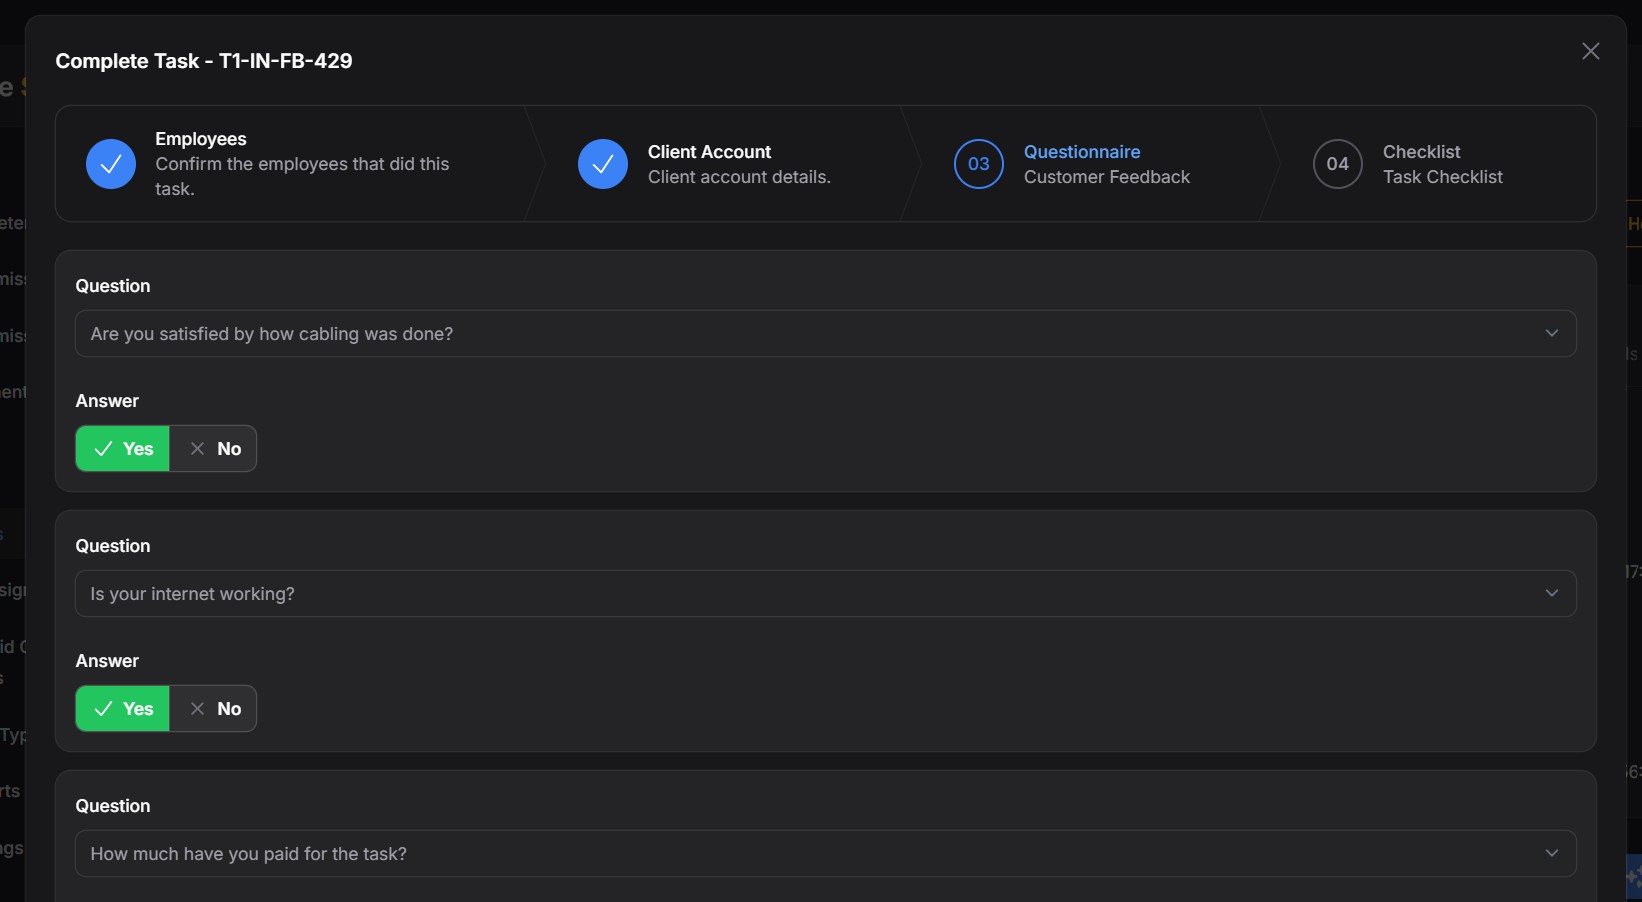
Collect direct responses from the client:

  • Examples:
    • “Are you satisfied with how cabling was done?”
    • “Is your internet working?”
    • “How much did you pay?”

The feedback questions are defined in the Task Types page. Learn more here.

4. Checklist #

Checklist Step

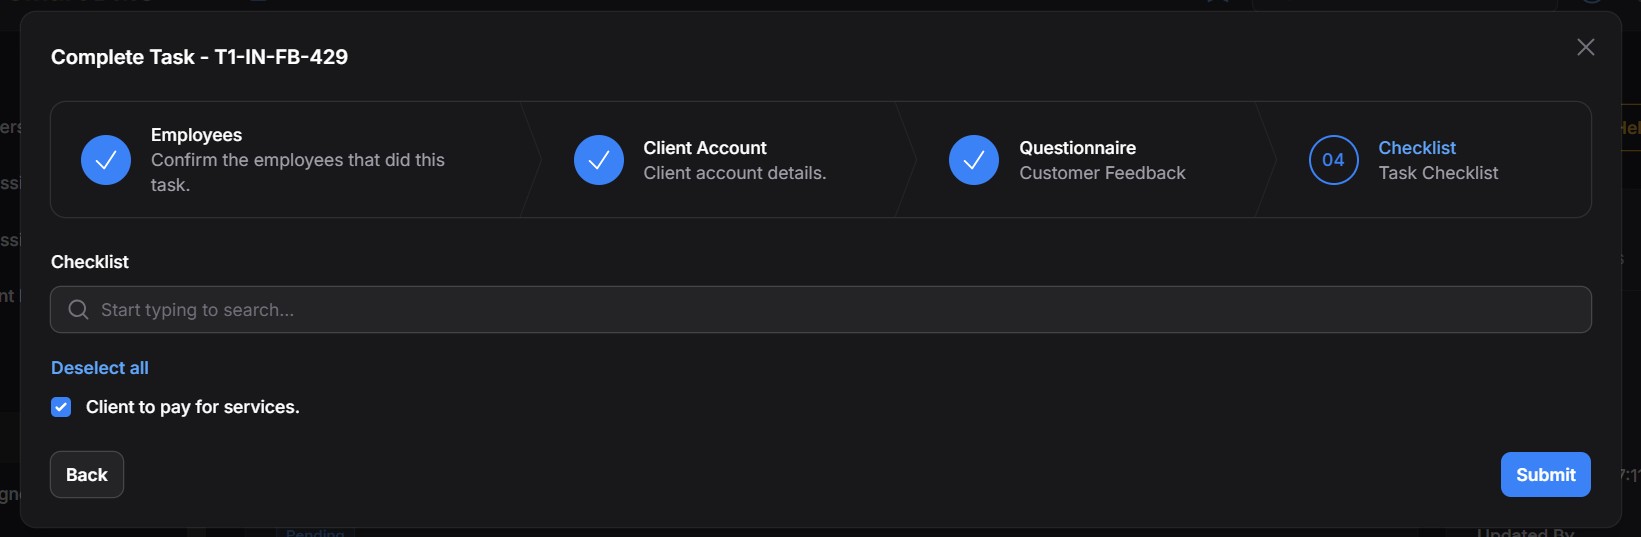
Tick off any task-specific requirements:

  • e.g., “Client to pay for services.”

The checklist items are defined as you create the task. Learn more here.

After reviewing all details, click Submit to complete the task.

Payments Phase – Completion Form Steps #

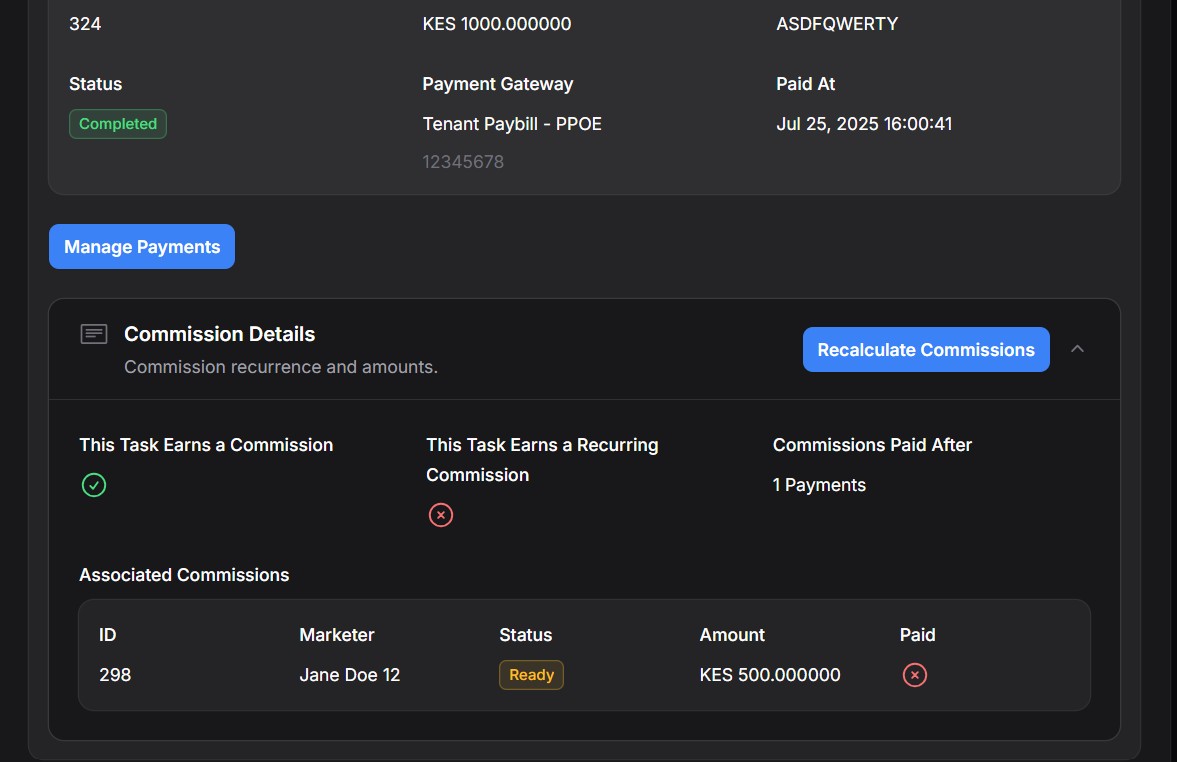
If the task has associated charges (like installation fees, transport fees, etc.), they need to be settled and recorded as payments.

  1. Scroll to the Charges section of the task.
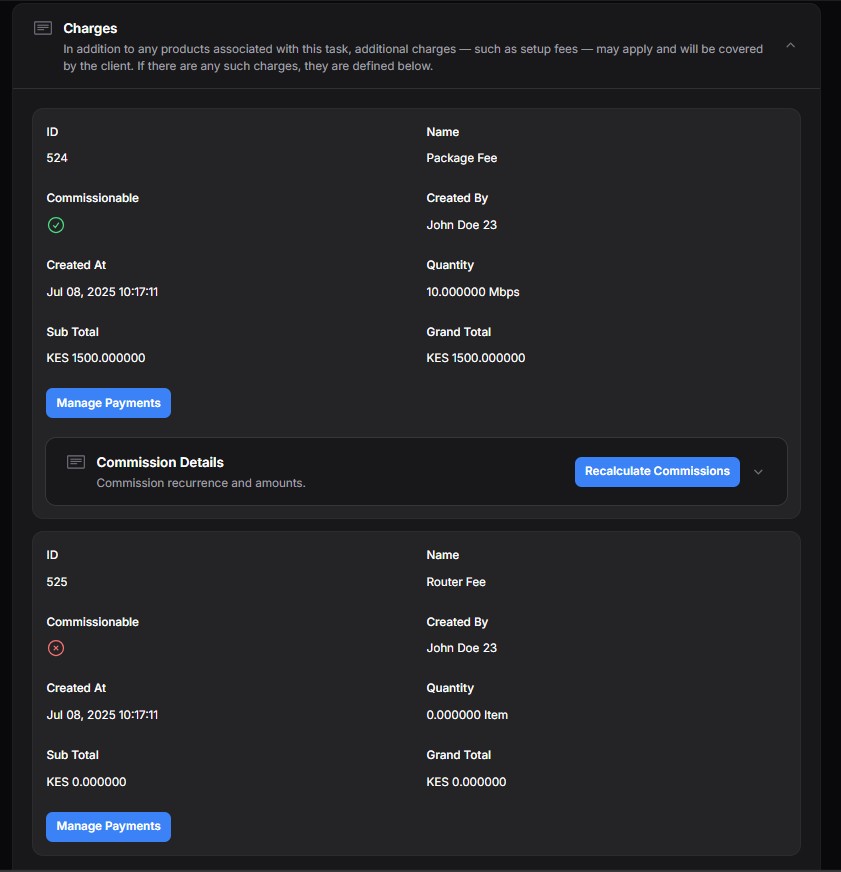
  2. Locate the specific charge item (e.g., Package Fee, Router Fee).
  3. Click the Manage Payments button next to the charge.

A modal will open showing:

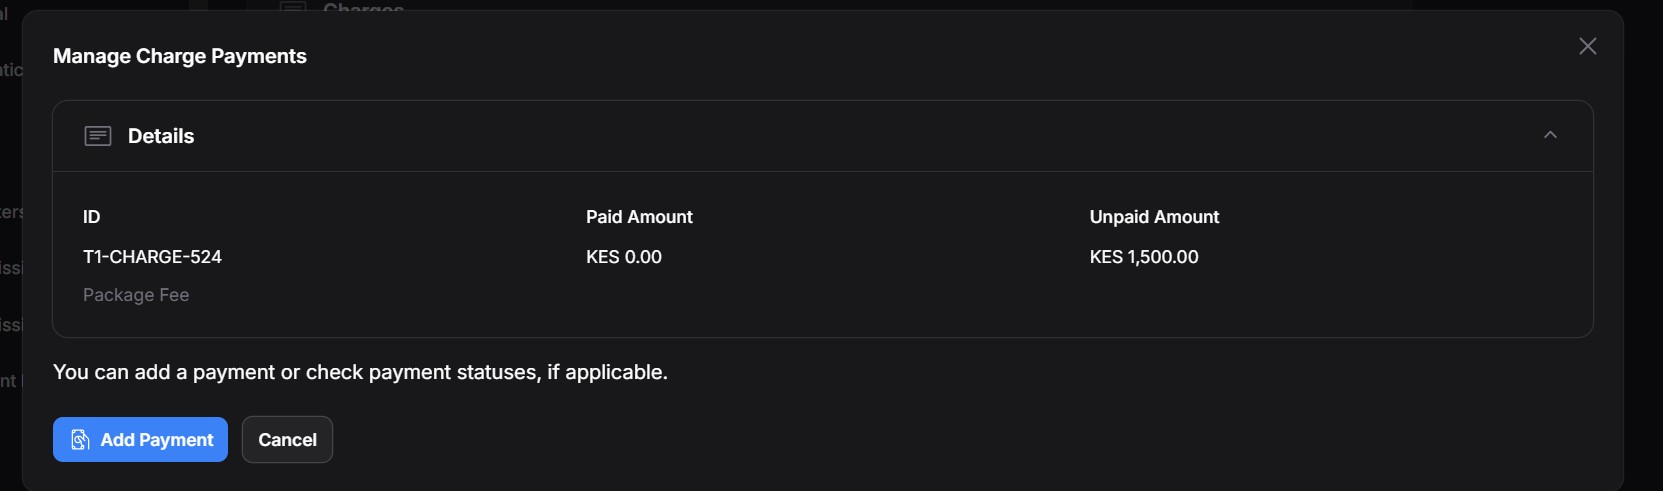
  • Invoice Breakdown – You’ll see how much has been paid vs. how much is still pending.
  • Existing Payments – If the charge has previous payments, they’ll appear in a list.
  • Click Add Payment to record a new one.

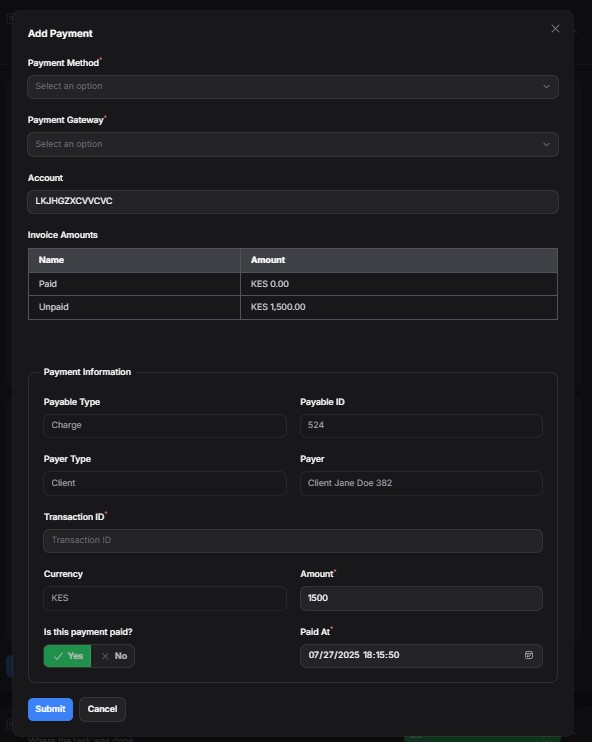
You’ll be presented with a form like one above, whose field description is as below:

FieldExplanation
Payment MethodChoose how the client paid (e.g., Cash, Bank Transfer, M-PESA, Card).
Payment GatewayThe system or tool used to process the payment (e.g., PayPal, Stripe, manual).
AccountThe account associated with the invoice. Pre-filled.
Invoice AmountsDisplays breakdown of what has been paid and what remains unpaid.
Payable TypeAlways set to Charge for task charges.
Payable IDInternal reference to the charge being paid for.
Payer TypeTypically Client, but could be another party in some setups.
PayerShows the client responsible for this charge.
Transaction IDReference number for the payment. Useful for reconciliation.
CurrencyCurrency used to make payment.
AmountHow much is being paid in this transaction.
Is this payment paid?Select Yes to mark as fully paid, or No if pending (e.g., in transit).
Paid AtDate and time when the payment was made.

Once completed, click Submit to save the payment.

If the charge was commissionable and the task was assigned to a marketer, the commission details will appear below the charge’s payments.

Commission Details

Share This Article :

  • Facebook
  • X
  • LinkedIn
  • Pinterest
Still stuck? How can we help?

How can we help?

How To View Unassigned TasksTask Statuses Overview
Table of Contents
  • Steps to Complete a Task
    • Confirmation Phase - Completion Form Steps
      • 1. Employees
      • 2. Client Account
      • 3. Questionnaire – Customer Feedback
      • 4. Checklist
    • Payments Phase - Completion Form Steps

123 Fifth Avenue, New York, NY 12004, USA.
+1 123 456 78 90
[email protected]

Copyright © 2025 The Smart DMS Knowledge Base